This is a simple renpy tutorial, In this tutorial I will show you how to custom your Renpy Confirm Screen. If you don't know how to custom confirm screen, then keep reading!
Preparation for the custom Gallery Screen
Things to prepare in advance:
1 picture as the background of the Confirm screen
1 as your frame picture showing yes or no
It's what it looked like when I didn't change anything at first
After changing to a white background and a new frame (the background and frame you prepared at the beginning):
Change Text Size
If you want to change text size - You can open gui.rpy and find
define gui.confirm_button_text_xalign = 0.5
Paste this code below this --> define gui.confirm_button_text_size =
Enter the size you want after the =
For example: define gui.confirm_button_text_size = 50
Change Text Color
If you want to Change Text Color - You can open gui.rpy and finddefine gui.confirm_button_text_xalign = 0.5
Paste this code below this --> define gui.confirm_button_text_color =
Enter the color you want to use after the =
For example: define gui.confirm_button_text_color = "#4B0082"
If you want to Change Displayed Text - You need to find in screen.rpy
these code:
textbutton _("Yes") action yes_action
textbutton _("No") action no_action
Change the text ("here")
So if I change to agree (同意) and disagree (不同意):
textbutton _(" 同意 ") action yes_action
textbutton _(" 不同意 ") action no_action
The screen will look like this:
If you want to change "你確定要離開嗎? " This string
You can open common.rpy and find the following code
# renpy/common/00gui.rpy:378
old "Are you sure you want to quit?"
new " 您確定您要離開嗎?"
Then you can change the in line new " here " (under old "Are you sure you want to quit?")
For example:
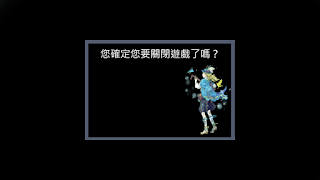
If I change to new " 您確定您要關閉遊戲了嗎?"
The screen will looks like this below:
Use Picture instead of Text
You can also use pictures to display the messages:
So you need to delete the code below firstly ↓↓
add "gui/overlay/confirm.png"
frame:
vbox:
xalign .5
yalign .5
spacing 30
label _(message):
style "confirm_prompt"
xalign 0.5
hbox:
xalign 0.5
spacing 100
textbutton _(" yes ") action yes_action
textbutton _(" no") action no_action
## Right-click and escape answer "no".
key "game_menu" action no_action
Then create a picture to display the screen
Example (image I use):
Then you can add the code below:
if message == layout.QUIT:
add "gui/Name Of Your Image.png"
textbutton " The Text you want to display" xpos Where the text should appear - X-axis ypos Where the text should appear - Y axis action yes_action
textbutton "The Text you want to display " xpos Where the text should appear - X-axis ypos Where the text should appear - Y axix action no_action
Things mark with green color are the things you can customize
For Example ↓↓:
if message == layout.QUIT:
add "gui/sure.png"
textbutton " 沒錯 " xpos 504 ypos 290 action yes_action
textbutton " 在等等 " xpos 498 ypos 390 action no_action
How to find the correct location I introduced in the last article, if you need it, you can click here just scroll to 3. Step
 Reviewed by NingNing
on
July 18, 2021
Rating:


請問你都是用什麼軟體或網站製作這些圖片的呢?
ReplyDelete以前是用Medibang paint也用過Krita現在是用Photoshop
DeleteGood
ReplyDelete