Some basic things has been covered in the second part, so this part will mainly focus on some places that are more difficult to find tutorial / more complex to do. It is recommended to read the second part first.
There should be a lot of similar/repeated content www. I chose to take it out separately and do another one mainly because I encountered more difficulties here.
Anyways to create a Preference screen, you can use Navigation's screen or use Imagemap
What I'm going to introduce in this article is to use imagemap to make Preference screen
1. Step - Preparation For Preferences Screen
So first you need to prepare image for : ground / idle / hover / selected_idle
ground: Used when nothing (to be) is selected (that is, when it is empty)
idle: Shows what the selectable object looks like before it is selected
hover: Shows what the selectable object will look like when selected
selected_idle: Keep the selected object as selected (( is to keep hover, so you can choose the same image as hover / Of course, you can also make other images, but I use the same image as hover
Optionally you can add:
selected_hover: Show what it looks like when you roll the mouse over an already selected object
When I read other people's tutorial before, some people will add a selected_hover, but I personally think this is not necessarily required
2. Step - Customize Preferences Screen's Code
After you have created the image or found an image to use as a background, you can place the image in the GUI folder in your renpy project folder
Open screen.rpy and enter:
screen preferences():

    tag menu

    imagemap:
        ground 'gui/gui_prefs_ground.png'
        idle 'gui/gui_prefs_idle.png'
        hover 'gui/gui_prefs_hover.png'
        selected_idle 'gui/gui_prefs_sidle.png'
        cache False
(You can delete the code originally under screen preferences or add # in front of them)
In addition to such a picture definition, you can also use auto to automatically define pictures
For example like this :
screen preferences():

    tag menu

    imagemap:
        auto "gui/gui_prefs_%s.png"
If you use auto, renpy will automatically detect all images starting with gui_prefs_ and determine which image is ground/ which image is hover. If you use auto, remember that the name of the image should be a name that renpy can recognize, and the path of the image should be more careful. ! You can also refer to this page ( official documentation )
3. Step - Find Your Hotspot
Methode 1
Open HotspotTool and find the right Hotspot
RenPy HotSpot Tool - How to use:
Use the above URL to download the tool and open it, click Load Image Base and Load Hover Image to load the image used to make the Imagemap

Click the + symbol in the upper right corner to draw the range that the mouse can click with the mouse
Click the - symbol in the upper right corner, and then slide to the previously drawn range. If you click it, the range of the point will be deleted.

For Example :

The top right corner is above + / - / Option
Click Load Data to load a previously saved file
Save Data to archive current changes
Save Code will generate an rpy file
After that, you can use this Tool to generate Hotspot
Copy to screen.rpy
Methode 2
Start the project and use Shift + D to enter the Developer Menu and click on the Image Location Picker
find out which image you want to use
Itwill list all the pictures in the folder, so you can find it slowly if there are many pictures

You can use the mouse to draw an area you want to use as a button

After that, you can see its hotspot in the lower left corner of the screen

For Example :
screen preferences():

    tag menu

    imagemap:
        ground 'gui/gui_prefs_ground.png'
        idle 'gui/gui_prefs_idle.png'
        hover 'gui/gui_prefs_hover.png'
        selected_idle 'gui/gui_prefs_sidle.png'
        cache False

        hotspot (45, 40, 210, 50) action ShowMenu("load")
        hotspot (45, 140, 210, 50) action ShowMenu("preferences")
        hotspot (45, 240, 210, 50) action ShowMenu("gallery")
        hotspot (45, 340, 210, 50) action ShowMenu("main_menu")
        hotspot (45, 440, 210, 50) action ShowMenu("help")
        hotspot (45, 540, 210, 50) action ShowMenu("about")
        hotspot (45, 640, 210, 50) action Quit(confirm=False)
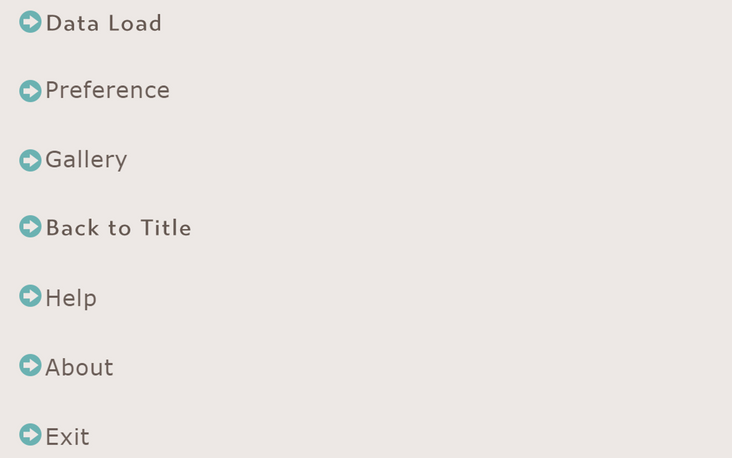
It is the image I used :

Using the above hotspot can make Renpy knows which range has a button
4. Step - Customize Display and Volume things
A Preference Screen has other options besides the above options, such as allowing players to choose to use full screen / small screen or skip settings and so on
These operations can also be rendered over imagemap
You can copy the following code to screen preferences, and then change it to your own hotspot
## Full Screnn or Window
hotspot (420, 68, 152, 46) action Preference('display', 'fullscreen')
hotspot (420, 120, 206, 69) action Preference('display', 'window')
## Skip Setting
hotspot (365, 245, 210, 60) action Preference('skip', 'seen')
hotspot (576, 246, 210, 60) action Preference('skip', 'all')

##Your Return Button
hotspot (1164, 608, 200, 118) action Return()

##Speed And Volume Setting
bar pos (899, 320) value Preference("text speed") style "pref_slider"
bar pos (899, 150) value Preference("sound volume") style "pref_slider"
bar pos (899, 65) value Preference("music volume") style "pref_slider"
bar pos (899, 440) value Preference("auto-forward time") style "pref_slider"
5.Step - Customize Bars
If Text Speed / Sound Volume / Music Volume / Auto-Forward Time looks weird or doesn't work, you can add style "pref_slider" after the code to replace the original in the gui/slider with a picture
horizontal_hover_bar
horizontal_hover_thumb
horizontal_idle_bar
horizontal_idle_thumb
To change the length/width of the bar you can add below the entire string of code
init -2 python:
    style.pref_slider.xmaximum = 350
    style.pref_slider.ymaximum = 25
style.pref_slider.xmaximum = Displays the length of the bar
style.pref_slider.ymaximum = display bar width
Additional resources used to create this tutorial:
GUI Example1: 空 想 曲 線 (the blue one)
GUI Example 2: momoizm (The one with a white floral pattern, a blue background, the paw of a dog)
Other related Link :
Click here to read the 5th article (Custom Renpy Gallery screen)
Click here to read the 4th article (Custom Renpy Confirm Screen)
Click here to read the 2nd article (Custom Renpy GUI)
Click here to read the 1st article (Basic Renpy Code Things)
【Renpy Tutorial #03】More advanced Preference screen customization
![【Renpy Tutorial #03】More advanced Preference screen customization]() Reviewed by NingNing
on
July 16, 2021
Rating:
Reviewed by NingNing
on
July 16, 2021
Rating:


No comments:
Leave A Message!